TinyML(2) - using low-sensitivity sensor to predict high-performance sensor
안녕하세요 민윤홍입니다.
고감도 센서 데이터의 패턴을 학습하여 저감도 센서 여러개로 고감도 센서처럼 사용할 수 있을까? 라는 의문에서 시작된 프로젝트 입니다.
사실 TinyML 입문 진입장벽이 있어서 그렇지 한번 입문하고 여기까지 응용하는데 그렇게 어렵지는 않았지만, 당시 처음부터 이거 구현하는데 2달이나 걸린 기억이 있습니다.(순수 Workday로 환산해도 2주일은 잡아먹은 것 같습니다.)
이렇게도 활용할 수 있구나~ 하고 가볍게 스크롤 쭉쭉 내리시면서 읽어보시면 좋을 것 같습니다.
원본
Github
https://github.com/HelloAcorn/TinyML-WZProject
GitHub - HelloAcorn/TinyML-WZProject: 여러개의 저감도 온습도 센서값을 AI로 보정하여 높은 감도의 센서
여러개의 저감도 온습도 센서값을 AI로 보정하여 높은 감도의 센서 퍼포먼스를 보여주는 프로젝트 - HelloAcorn/TinyML-WZProject
github.com
Summary
이 게시물은 고비용 센서와 저비용 센서 간의 성능 차이를 AI 신경망을 사용하여 개선하는 방법을 다룹니다. 저자들은 자사의 저비용 센서로 측정된 습도가 고비용 센서와 상당한 차이를 보인다고 언급합니다. 이를 해결하기 위해 저자들은 여러 저비용 센서를 사용하여 수집된 데이터를 기반으로 신경망 모델을 훈련시켜 저비용 센서의 성능을 개선하는 방법을 제시합니다. 실험 결과, 신경망은 저비용 센서의 데이터를 고비용 센서의 데이터와 유사하게 예측하는 데 성공했으며, 이는 센서 비용을 줄이면서 정확도를 유지할 수 있는 방법을 제시한다는 점에서 의미가 있습니다. 또한, 효율적인 데이터 관리와 모델 양자화를 위한 TinyML 사용 과정도 설명됩니다.
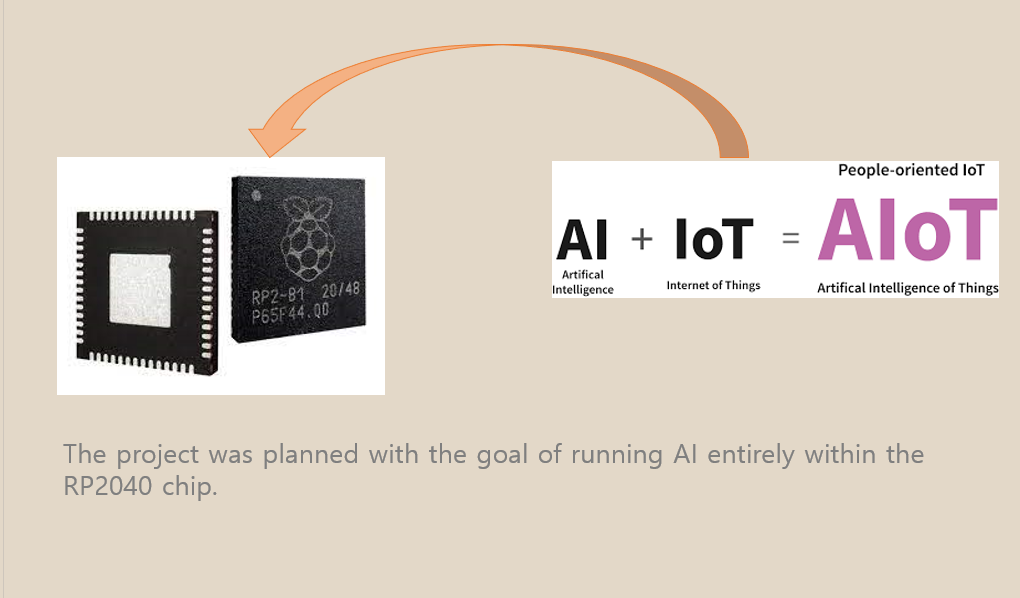
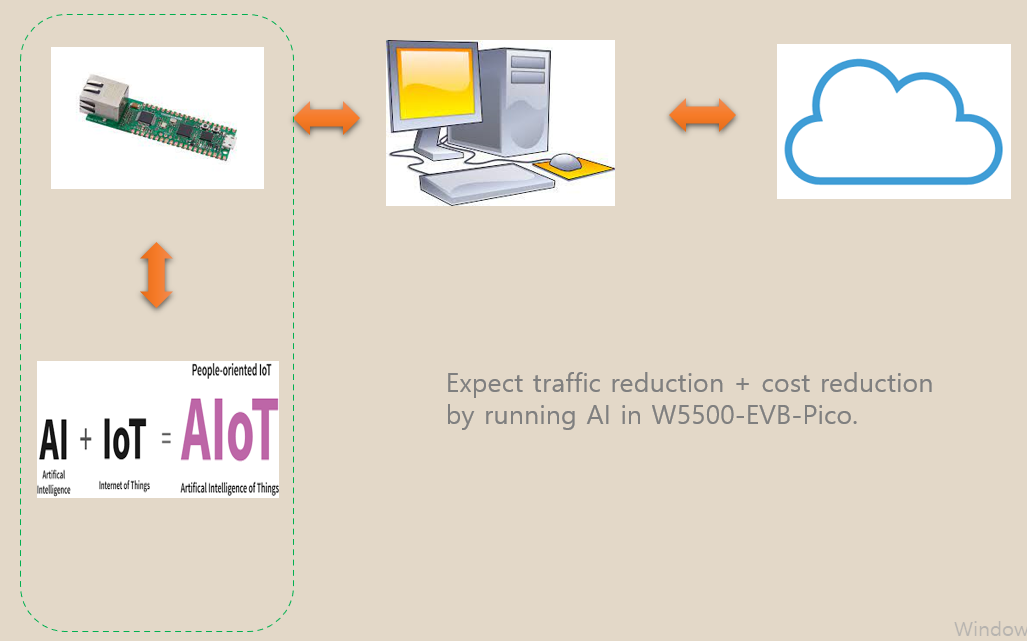
비즈니스 관점에서 W5500-EVB-Pico (RP2040) 칩에 AI를 적용하면 트래픽을 줄이고 비용을 절감할 수 있을 것으로 예상됩니다.
Configuration of high-cost and low-cost sensors
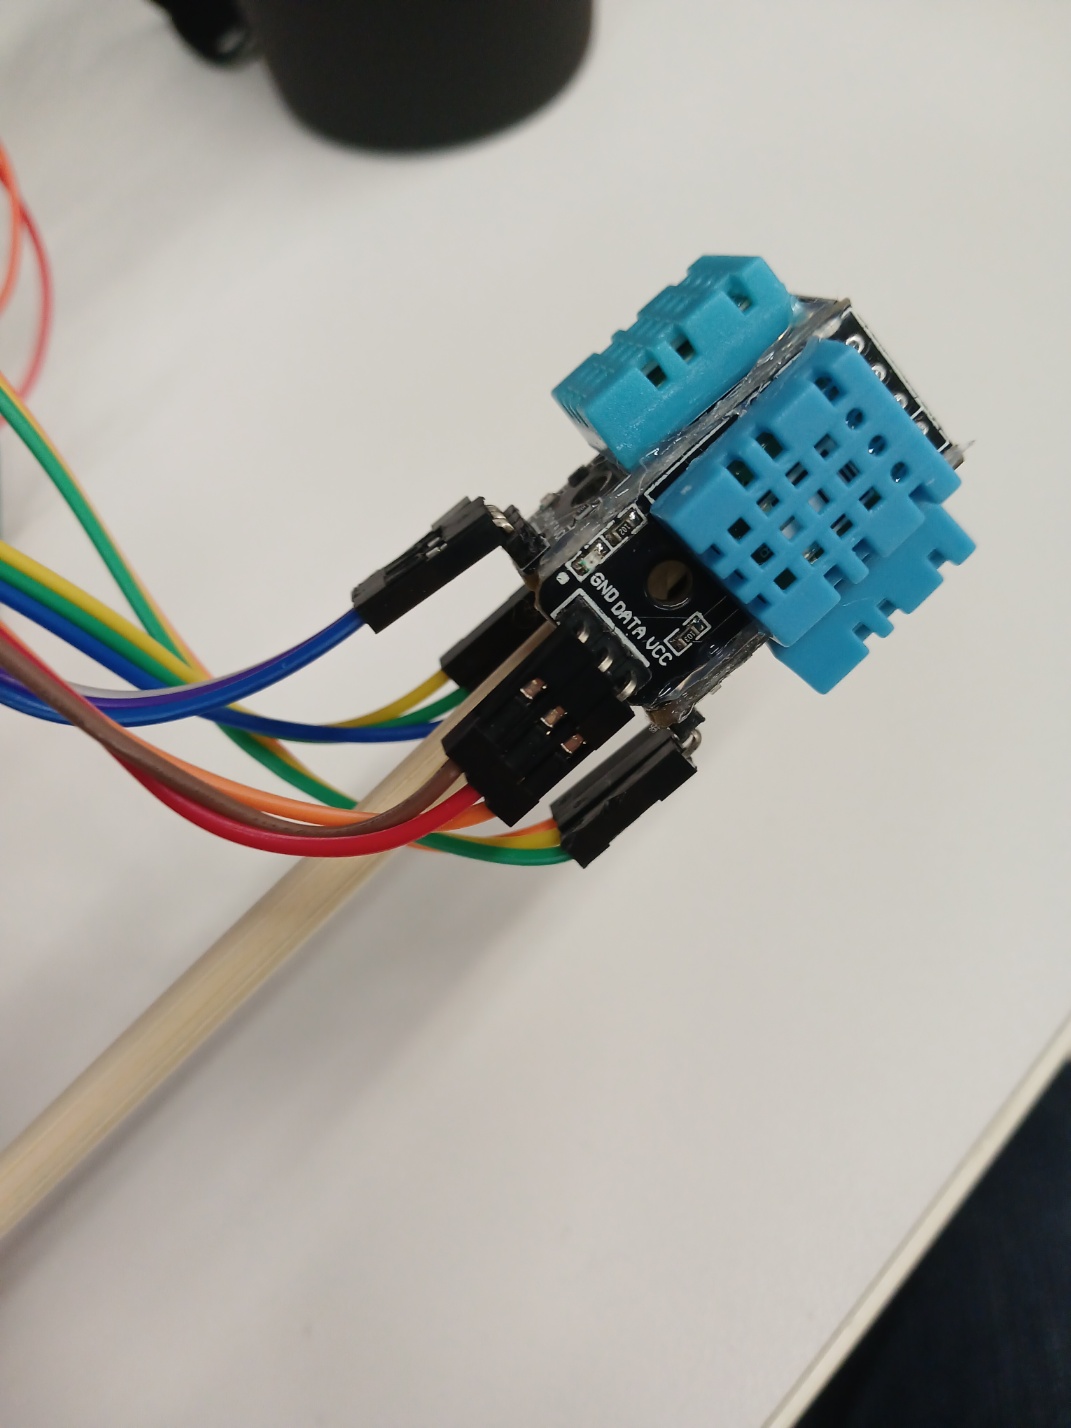
high cost sensor
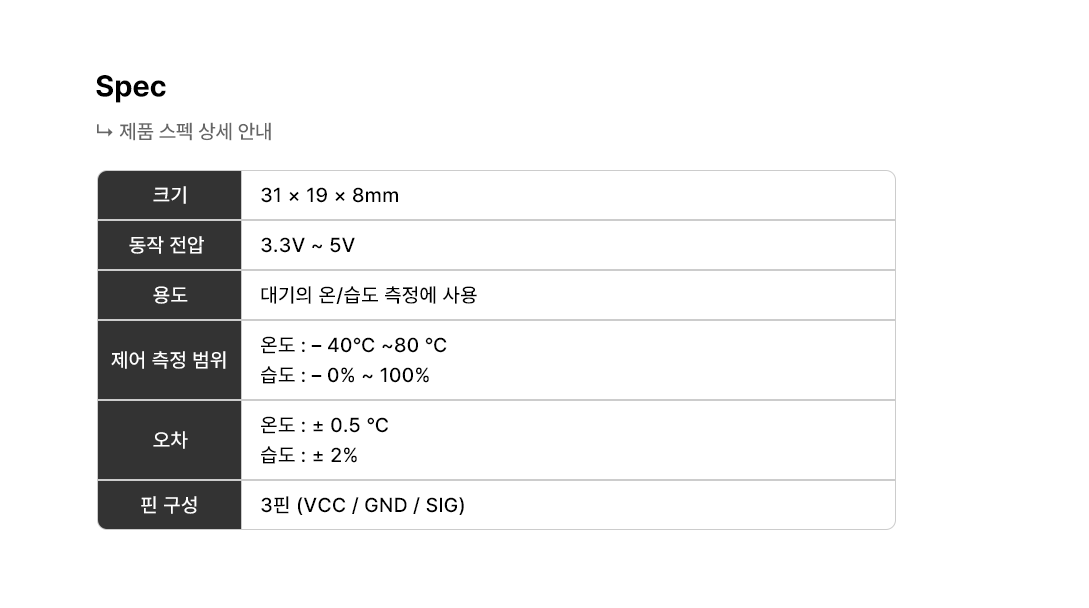
Temperature error: ±0.5 C
Humidity: ±2%
low cost sensor
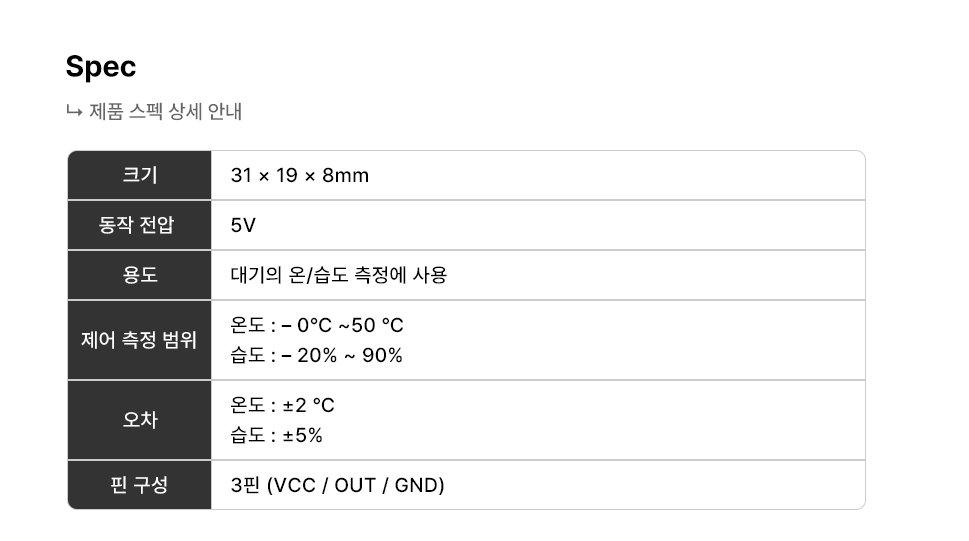
Temperature error: ± 2 C
Humidity: ± 5%
저비용 센서의 경우 습도가 약 ±5%로 표시되었으나, 실제 측정 결과는 고비용 센서와 매우 달랐습니다.
나중에 데이터를 확인해보면 알 수 있듯이, 제가 일하는 회사에서 측정 당시 저렴한 센서는 약 0-10%의 습도를 기록한 반면, 고급 센서는 약 30-40%의 습도를 기록했습니다. 이 데이터를 기반으로 신경망을 통한 예측을 통해 센서의 성능을 개선할 수 있으며, 동시에 비싼 센서를 사용하지 않고 여러 저비용 센서를 활용하여 저비용 센서의 성능을 향상시킬 수 있습니다.
Project configuration
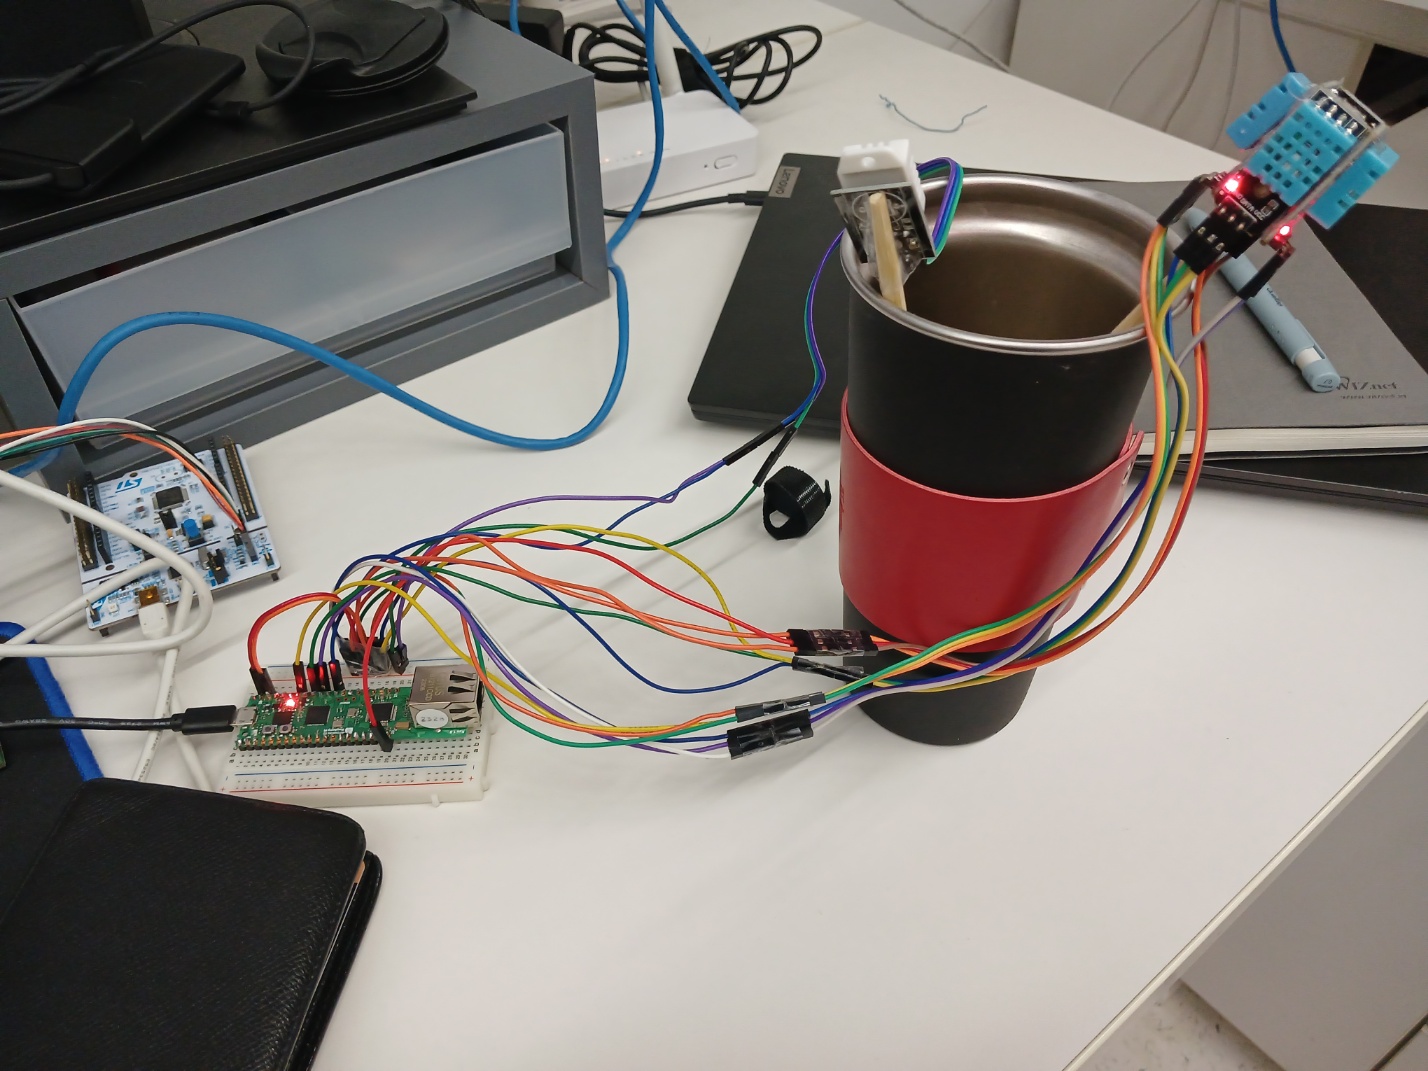
가능한 한 동일한 환경에서 하나의 고비용 센서와 여러 개의 저비용 센서를 측정합니다
네 개의 저감도 센서를 부착했습니다.
Data Collection
데이터 수집의 경우, 제 컴퓨터와 Pico 간의 직렬 통신을 통해 Python 코드를 사용하여 데이터를 수집했습니다. Pico에서는 10초마다 센서 데이터를 수집하여 Python으로 전송하였고, Python에서는 직렬로 수신된 데이터를 축적하여 csv 파일로 저장했습니다.
tem_humid.ino
#include "DHT.h"

//0,1,7,15,16
#define low_dt1 15
#define low_dt2 28
#define low_dt3 27
#define low_dt4 26
#define high_dt 22


DHT low_Dht1(low_dt1, DHT11);
DHT low_Dht2(low_dt2, DHT11);
DHT low_Dht3(low_dt3, DHT11);
DHT low_Dht4(low_dt4, DHT11);
DHT high_Dht(high_dt, DHT22);

void setup() {
  Serial.begin(9600);
  low_Dht1.begin();
  low_Dht2.begin();
  low_Dht3.begin();
  low_Dht4.begin();
  high_Dht.begin();
}

void loop() {

    // 센서의 온도와 습도를 읽어온다.
  float low1_h = low_Dht1.readHumidity();
  float low1_t = low_Dht1.readTemperature();
  float low2_h = low_Dht2.readHumidity();
  float low2_t = low_Dht2.readTemperature();
  float low3_h = low_Dht3.readHumidity();
  float low3_t = low_Dht3.readTemperature();
  float low4_h = low_Dht4.readHumidity();
  float low4_t = low_Dht4.readTemperature();
  float high_h = high_Dht.readHumidity();
  float high_t = high_Dht.readTemperature();

  if (isnan(low1_h) || isnan(low1_t)|| isnan(low2_h) || isnan(low2_t)|| isnan(low3_h)
  || isnan(low3_t)|| isnan(low4_h) || isnan(low4_t)|| isnan(high_h) || isnan(high_t) ) {
    //값 읽기 실패시 시리얼 모니터 출력
    Serial.println("Failed to read from DHT");
  } else {
    //온도, 습도 표시 시리얼 모니터 출력
    Serial.print(String(low1_h) + " "+String(low1_t) + " "+String(low2_h) + " "+String(low2_t) + " "+String(low3_h) + " "+String(low3_t) +
    " "+String(low4_h) + " "+String(low4_t) + " "+String(high_h) + " "+String(high_t)+ "\n");
  }
  delay(10000);

}
온도 및 습도 센서 데이터는 10초마다 한 번씩 직렬 통신을 통해 전송됩니다.
getdata.py
import serial
import csv
import os
from datetime import datetime

# 시리얼 포트 설정
ser = serial.Serial('COM13', 9600)

# CSV 파일 설정
filename = "sensor_data.csv"
file_exists = os.path.isfile(filename)  # 파일이 이미 존재하는지 확인
row_count = 0
with open(filename, 'r') as file:
    reader = csv.reader(file)
    row_count = sum(1 for row in reader)  # 모든 행을 순회하며 세기


with open(filename, 'a', newline='') as file:  # 'a' 모드로 파일 열기
    writer = csv.writer(file)
    if not file_exists:
        writer.writerow(["Timestamp", "Low1_Humidity", "Low1_Temperature", "Low2_Humidity", "Low2_Temperature",
                         "Low3_Humidity", "Low3_Temperature", "Low4_Humidity", "Low4_Temperature",
                         "High_Humidity", "High_Temperature"])  # 파일이 새로 생성되면 컬럼명 추가

    print("온,습도가 기록중입니다...")
    while True:
        if ser.in_waiting:
            data = ser.readline().decode('utf-8').rstrip()
            if data and "Failed to read from DHT" not in data:
                row_count += 1
                data_list = data.split(" ")
                data_list.insert(0, datetime.now().strftime("%Y-%m-%d %H:%M:%S"))
                print(f"DataCount: {row_count} | DataStamp: {data_list}", end='\r')
                writer.writerow(data_list)
                file.flush()
직렬 통신을 통해 수신된 데이터를 CSV 파일로 저장합니다.
Data file(.csv)
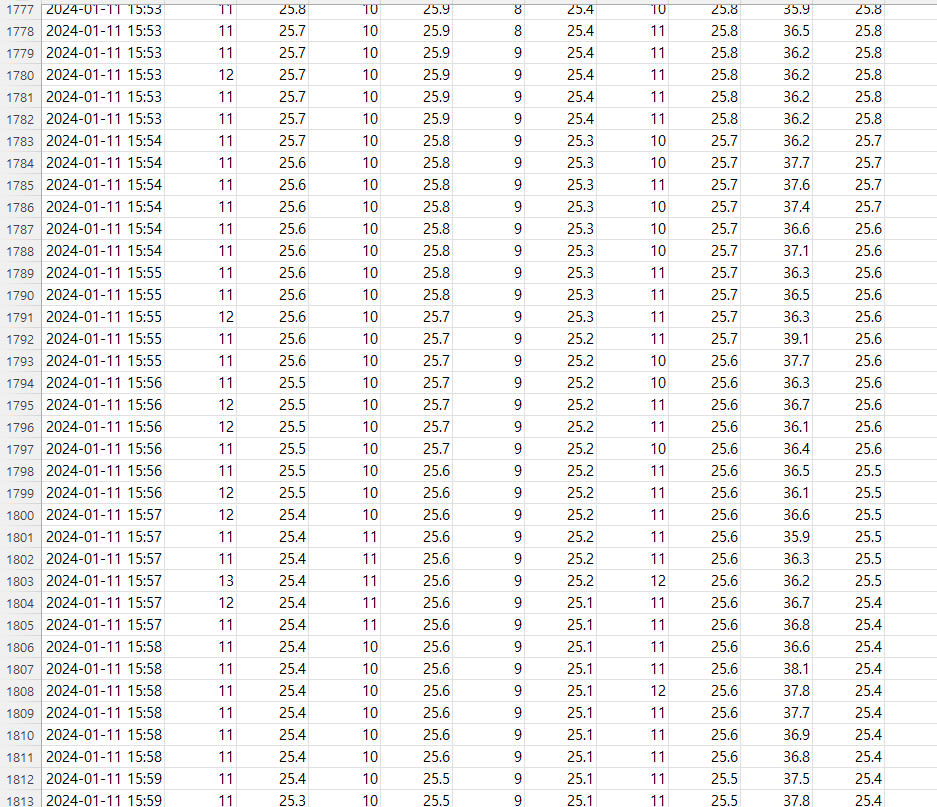
약 4400개의 데이터가 축적되었습니다. 회사 내 실제 습도는 약 35-40%로 유지되었지만, 네 개의 저비용 센서가 기록한 습도는 0-12% 범위 내에 있었습니다. 이로 인해 AI(신경망)를 사용해 센서 값을 수정하는 방법이 더 효과적일 수 있습니다.
Construct and train neural network models
# 입력 및 타겟 데이터 선택
X = sensor_data[['Low1_Humidity', 'Low1_Temperature', 'Low2_Humidity', 'Low2_Temperature', 'Low3_Humidity', 'Low3_Temperature', 'Low4_Humidity', 'Low4_Temperature']]
y = sensor_data[['High_Humidity', 'High_Temperature']]

# 데이터 분할: 훈련 세트와 테스트 세트
X_train, X_test, y_train, y_test = train_test_split(X, y, test_size=0.2, random_state=42)

# 추가 데이터 분할: 훈련 세트를 다시 훈련 세트와 검증 세트로 분할
X_train, X_val, y_train, y_val = train_test_split(X_train, y_train, test_size=0.25, random_state=42)  # 전체 데이터의 20%가 검증 세트가 됨

# 결과 확인
X_train.shape, X_val.shape, X_test.shape

# 모델 생성
model = tf.keras.Sequential([
    tf.keras.layers.Dense(64, activation='relu', input_shape=(X_train.shape[1],)),
    tf.keras.layers.Dense(64, activation='relu'),
    tf.keras.layers.Dense(2)  # High_Humidity와 High_Temperature에 대한 출력
])

# 모델 컴파일: MAE 측정 추가
model.compile(optimizer='adam', loss='mean_squared_error', metrics=['mean_squared_error', 'mean_absolute_error'])

# 모델 훈련 및 평가
history = model.fit(X_train, y_train, epochs=450, batch_size=128, validation_data=(X_val, y_val))

# 모델 평가
loss, mse, mae = model.evaluate(X_test, y_test)
print(f"Test Loss: {loss}, Test MSE: {mse}, Test MAE: {mae}")
Test MSE: 0.41999197006225586, Test RMSE: 0.6480678745797047, Test MAE: 0.24979573488235474MAE(평균 절대 오차)는 0.25로, 이는 저비용 센서의 예측값과 고비용 센서의 실제 값 간의 평균 차이가 ±0.25에 불과하다는 의미입니다. 이런 결과는 매우 우수한 성과입니다.
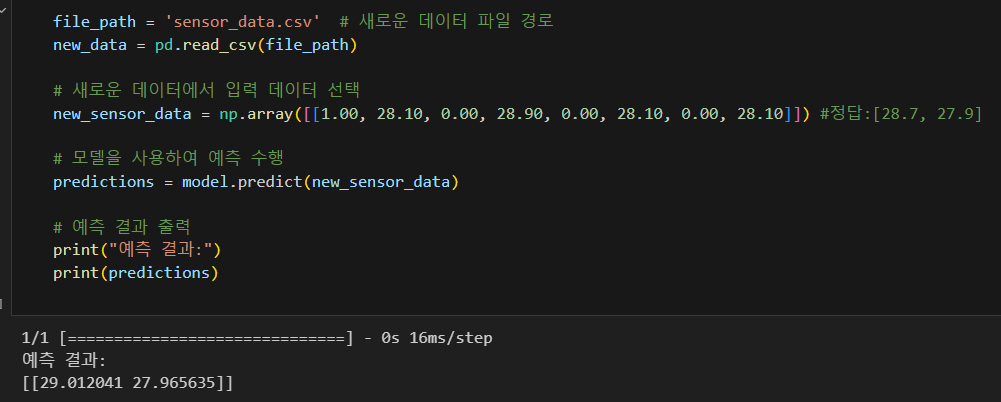
정답을 살펴보면, 실제 결과로는 습도 28.7%, 온도 27.9°C가 기록되었고, 신경망을 통해 예측된 값은 습도 29.01%, 온도 27.96°C로, 온도와 습도를 포함한 오차가 약 0.3%P 정도 나타났습니다.
Visualize and test model evaluation
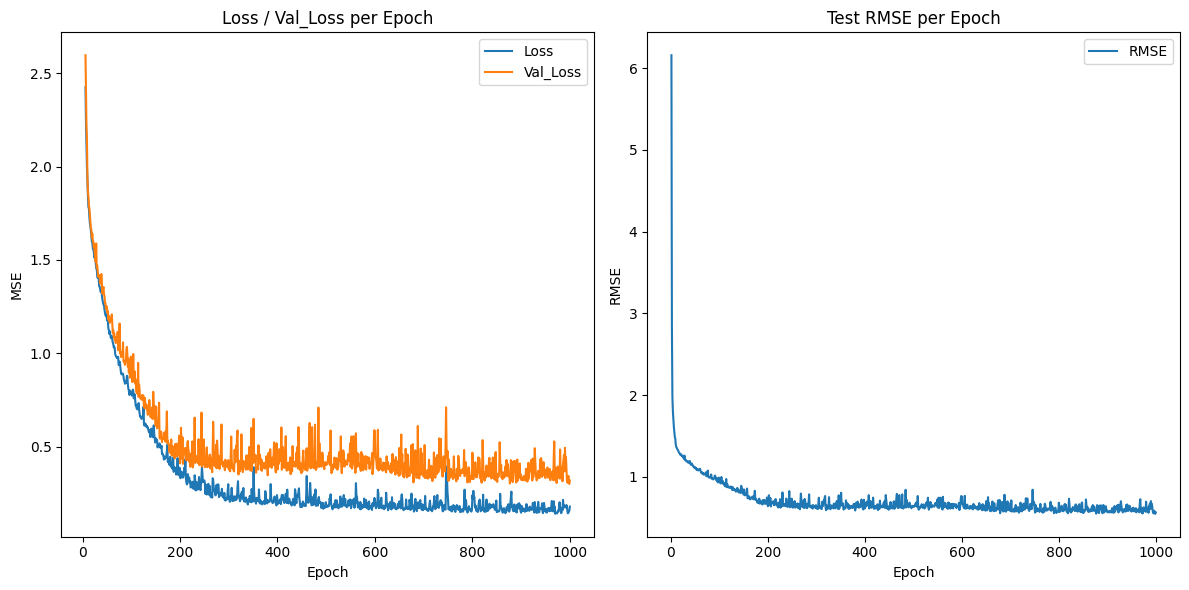
학습 모델의 경우, 1000 epochs 동안 훈련했음에도 불구하고 역전파(backpropagation)의 징후가 나타나지 않았습니다. 이는 4,400개의 데이터 세트 중 4,000개 이상이 습도 35~40%와 온도 27°C ~29°C에서 측정되어 큰 변화가 없었기 때문입니다.
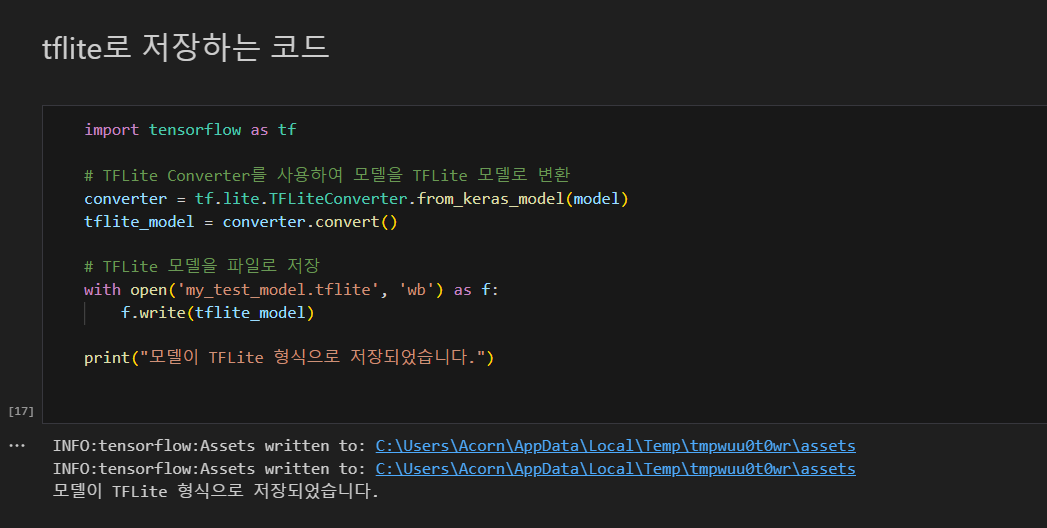
tflite 확장자를 사용하여 모델을 양자화합니다. 이렇게 하면 TinyML을 위한 모델 설정이 완료됩니다.
W5500 Evb Pico In TinyML
.tflite 확장자로 생성된 모델은 직접 사용할 수 없습니다. Arduino 환경에서 사용하려면 아래와 같이 .h와 .cpp 모델을 생성해야 합니다. 생성 명령어는 다음과 같습니다.
xxd -i your_model.tflite > model_data.cc
my_test_model.cpp
#include "tensorflow/lite/micro/examples/TinyML-HygroPredict/my_test_model.h"

// We need to keep the data array aligned on some architectures.
#ifdef __has_attribute
#define HAVE_ATTRIBUTE(x) __has_attribute(x)
#else
#define HAVE_ATTRIBUTE(x) 0
#endif
#if HAVE_ATTRIBUTE(aligned) || (defined(__GNUC__) && !defined(__clang__))
#define DATA_ALIGN_ATTRIBUTE __attribute__((aligned(4)))
#else
#define DATA_ALIGN_ATTRIBUTE
#endif

unsigned const char g_hygropredict_model_data[] = {
  0x1c, 0x00, 0x00, 0x00, 0x54, 0x46, 0x4c, 0x33, 0x14, 0x00, 0x20, 0x00,
  0x1c, 0x00, 0x18, 0x00, 0x14, 0x00, 0x10, 0x00, 0x0c, 0x00, 0x00, 0x00,
  0x08, 0x00, 0x04, 0x00, 0x14, 0x00, 0x00, 0x00, 0x1c, 0x00, 0x00, 0x00,
  0x94, 0x00, 0x00, 0x00, 0xec, 0x00, 0x00, 0x00, 0x08, 0x4e, 0x00, 0x00,
  0x18, 0x4e, 0x00, 0x00, 0x28, 0x53, 0x00, 0x00, 0x03, 0x00, 0x00, 0x00,
  0x01, 0x00, 0x00, 0x00, 0x10, 0x00, 0x00, 0x00, 0x00, 0x00, 0x0a, 0x00,
  0x10, 0x00, 0x0c, 0x00, 0x08, 0x00, 0x04, 0x00, 0x0a, 0x00, 0x00, 0x00,
  0x0c, 0x00, 0x00, 0x00, 0x1c, 0x00, 0x00, 0x00, 0x38, 0x00, 0x00, 0x00,
  0x0f, 0x00, 0x00, 0x00, 0x73, 0x65, 0x72, 0x76, 0x69, 0x6e, 0x67, 0x5f,
   ...
   ...
  0x64, 0x65, 0x66, 0x61, 0x75, 0x6c, 0x74, 0x00, 0x01, 0x00, 0x00, 0x00,
  0x04, 0x00, 0x00, 0x00, 0x94, 0xff, 0xff, 0xff, 0x09, 0x00, 0x00, 0x00,
  0x04, 0x00, 0x00, 0x00, 0x07, 0x00, 0x00, 0x00, 0x64, 0x65, 0x6e, 0x73}
양자화된 모델을 준비한 후, 이제 Arduino IDE에서 실행하면 됩니다!
Build on Arduino
main.ino
#include "DHT.h"
#include <TensorFlowLite.h>
#include "main_functions.h"
#include "constants.h"
#include "my_test_model.h"
#include "tensorflow/lite/micro/kernels/all_ops_resolver.h"
#include "tensorflow/lite/micro/micro_error_reporter.h"
#include "tensorflow/lite/micro/micro_interpreter.h"
#include "tensorflow/lite/schema/schema_generated.h"
#include "tensorflow/lite/version.h"
// 센서 핀 정의
#define low_dt1 15
#define low_dt2 28
#define low_dt3 27
#define low_dt4 26
#define high_dt 22
DHT low_Dht1(low_dt1, DHT11);
DHT low_Dht2(low_dt2, DHT11);
DHT low_Dht3(low_dt3, DHT11);
DHT low_Dht4(low_dt4, DHT11);
DHT high_Dht(high_dt, DHT22);
namespace {
tflite::ErrorReporter* error_reporter = nullptr;
const tflite::Model* model = nullptr;
tflite::MicroInterpreter* interpreter = nullptr;
TfLiteTensor* input = nullptr;
TfLiteTensor* output = nullptr;
constexpr int kTensorArenaSize = 8 * 1024;
uint8_t tensor_arena[kTensorArenaSize];
}
void setup() {
Serial.begin(9600);
low_Dht1.begin();
low_Dht2.begin();
low_Dht3.begin();
low_Dht4.begin();
high_Dht.begin();
static tflite::MicroErrorReporter micro_error_reporter;
error_reporter = µ_error_reporter;
model = tflite::GetModel(g_hygropredict_model_data);
if (model->version() != TFLITE_SCHEMA_VERSION) {
TF_LITE_REPORT_ERROR(error_reporter, "Model schema version mismatch!");
return;
}
static tflite::ops::micro::AllOpsResolver resolver;
static tflite::MicroInterpreter static_interpreter(model, resolver, tensor_arena, kTensorArenaSize, error_reporter);
interpreter = &static_interpreter;
if (interpreter->AllocateTensors() != kTfLiteOk) {
Serial.println("Failed to allocate tensors!");
return;
}
input = interpreter->input(0);
output = interpreter->output(0);
}
// The name of this function is important for Arduino compatibility.
void loop() {
// 센서값 읽기
float low1_h = low_Dht1.readHumidity();
float low1_t = low_Dht1.readTemperature();
float low2_h = low_Dht2.readHumidity();
float low2_t = low_Dht2.readTemperature();
float low3_h = low_Dht3.readHumidity();
float low3_t = low_Dht3.readTemperature();
float low4_h = low_Dht4.readHumidity();
float low4_t = low_Dht4.readTemperature();
float high_h = high_Dht.readHumidity();
float high_t = high_Dht.readTemperature();
if (isnan(low1_h) || isnan(low1_t)|| isnan(low2_h) || isnan(low2_t)|| isnan(low3_h)
|| isnan(low3_t)|| isnan(low4_h) || isnan(low4_t)|| isnan(high_h) || isnan(high_t) ) {
//값 읽기 실패시 시리얼 모니터 출력
Serial.println("Failed to read from DHT");
}else {
// 입력 텐서에 센서 데이터 설정
input->data.f[0] = low1_h;
input->data.f[1] = low1_t;
input->data.f[2] = low2_h;
input->data.f[3] = low2_t;
input->data.f[4] = low3_h;
input->data.f[5] = low3_t;
input->data.f[6] = low4_h;
input->data.f[7] = low4_t;
// 모델 실행
if (interpreter->Invoke() != kTfLiteOk) {
Serial.println("Failed to invoke tflite!");
return;
}
// 출력 텐서에서 예측값 읽기
float predicted_high_h = output->data.f[0];
float predicted_high_t = output->data.f[1];
// 결과 출력
Serial.println("Predicted:[" + String(predicted_high_h) + ", " + String(predicted_high_t) +
"] Real:[" + String(high_h) + ", " + String(high_t) + "]");
}
delay(1500);
}
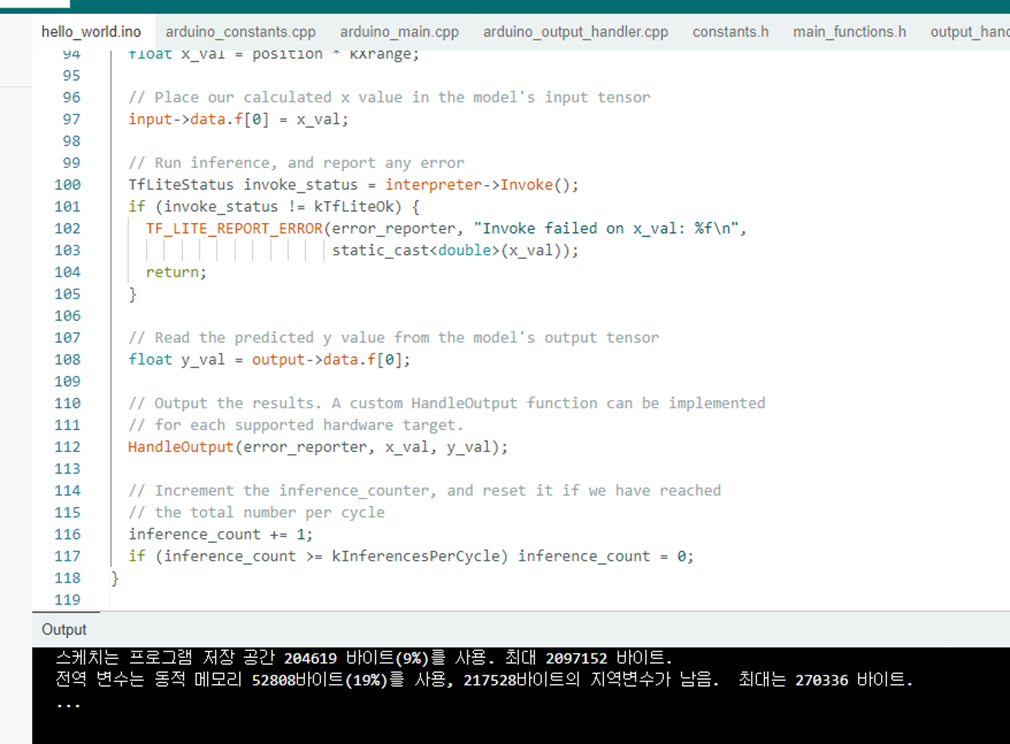
tflite를 사용하기 위한 모듈을 로드합니다. 이 예제에서는 센서 데이터만 사용하므로 tflite의 필수 헤더 파일, DHT, 그리고 my_test_model.h 헤더 파일만 로드됩니다.
setup() 함수에서 센서를 초기화하고, loop() 함수에서 센서 값을 측정한 후, 이 값을 양자화된 모델에 입력하여 측정된 값과 예측된 값을 비교합니다. 신경망의 입력 값을 추론하려면 interpreter->Invoke() 함수를 사용하면 됩니다. 이후, 결과 데이터는 output->data.f[n] 배열에 순차적으로 저장됩니다. 아래는 최종 실행 결과입니다.
Result
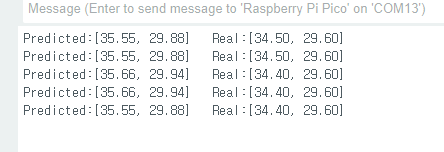
예측 값과 고성능 센서의 측정 값 사이에는 큰 차이가 없습니다. 만약 편향된 데이터 세트 대신 고품질 데이터 세트를 구축할 수 있다면, 더 명확한 예측 값을 얻을 수 있을 것이라고 생각합니다.
저감도 센서 데이터를 사용하여 고성능 센서의 온도와 습도를 예측하는 데 TinyML을 활용할 수 있다는 충분한 예시라고 생각합니다.